Arduino IDE is designed to program Arduino boards featuring an AVR microcontroller with an Arduino bootloader. But Do you know that the same Arduino IDE can be used to program other Atmega microcontrollers, even without a bootloader?.
Well it can. But you need an extra AVR programmer like USBASP. This method has many advantages like extra program memory space of about 2 Kb due to not using a bootloader, short prototyping time compared to coding in C. Moreover, one need not buy the Arduino board for every project, as we can use the cheaper Atmegas.
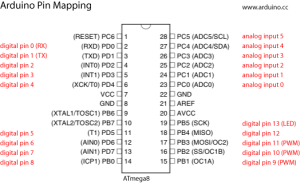
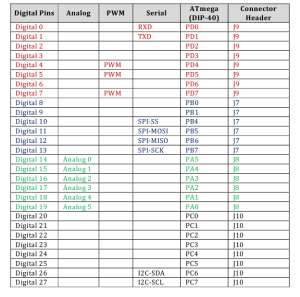
I tried Atmega 8 and Atmega 32. Both of them works flawless with the Arduino IDE.The hardware is simple and consists of just the power supply, a crystal (8MHz for atmega 8 and 16MHz for Atmega32 etc. The Atmega to Arduino pin mapping for both of them is given below
The Arduino IDE uploads sketches default using the bootloader and through the serial port. Now we have to change it to the USBASP. This can be done by editing the file named programmers.txt located at ~/arduino-xxx/hardware/arduino directory. We have to add an entry corresponding to our USBASP to the end of the file named programmers.txt.
ie
usbasp.name=usbasp
usbasp.communication=usb
usbasp.protocol=usbasp
Now we have to edit the file named boards.txt located in the same directory to include our custom boards.We have to add two entries, one for Atmega 8 and the other for Atmega 32. Add the following to the end of Boards.txt
##############################################################

atmega32.name=ArduinoMega32
atmega32.upload.using=usbasp
atmega32.upload.protocol=usb
atmega32.upload.maximum_size=32768
atmega32.upload.speed=38400

atmega32.bootloader.low_fuses=0xff
atmega32.bootloader.high_fuses=0xdf
atmega32.bootloader.extended_fuses=0x00
atmega32.bootloader.path=atmega
atmega32.bootloader.file=ATmegaBOOT.hex
atmega32.bootloader.unlock_bits=0x3F
atmega32.bootloader.lock_bits=0x0F

atmega32.build.mcu=atmega32
atmega32.build.f_cpu=16000000L
atmega32.build.core=arduino

#################################################################

atmega8.name=ATmega8 @8MHz

atmega8.upload.using=usbasp
atmega8.upload.protocol=usb
atmega8.upload.maximum_size=8192
atmega8.upload.speed=38400

atmega8.bootloader.low_fuses=0xef
atmega8.bootloader.high_fuses=0xc4
atmega8.bootloader.path=atmega8_
atmega8.bootloader.file=ATmegaBOOT.hex
atmega8.bootloader.unlock_bits=0x3F
atmega8.bootloader.lock_bits=0x0F

atmega8.build.mcu=atmega8
atmega8.build.f_cpu=8000000L
atmega8.build.core=arduino
Now we have to add the some more files. Download this and extract it. Replace the cores directory (~/arduino-xxx/hardware/arduino/cores) with the downloaded folder. Thats all.. you are done. Now you can find two more entries correponding to Atmega 8 and Atmega 32 under your tools>boards option. Select the one of your choice and code…
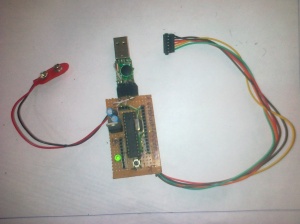
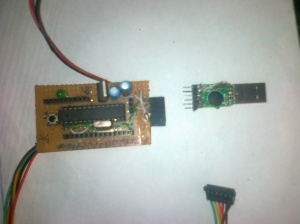
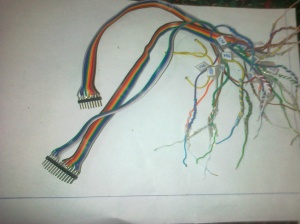
The code generated using Arduino IDE is much less efficient than the one generated using assembly or even C. It takes more machine cycles to execute. But the main advantage is that the development time of a project will reduce drastically. It is due to the huge number of libraries available for arduino. I built my own versions of Arduino clones on some perf boards and used alot of berg strips. It may feel awkward but it does help very much in rapid prototyping and debugging. below are some photos of my arduino clones.




It doesn’t work. Error in compiling… \Arduino\hardware\arduino\cores\arduino/Arduino.h:129: error: ‘port_to_output_PGM’ has a previous declaration as ‘const uint16_t port_to_output_PGM []’
just tried simple analogReadInSerial but it won0t compile doesn’t work, say something about A0 not defined, same for all other analog inputs.
Sorry MileSRB got busy for couple of years ….back now …i will look into it and the current modification only partially supports the ATMEGA 32 support ……..i will soon come back a properly modified IDE.
its not working and shows error as :
Arduino: 1.5.4 (Windows 7), Board: “ArduinoMega32”
Blink.ino:10:21: error: Arduino.h: No such file or directory
Blink.ino: In function ‘void setup()’:
Blink:15: error: ‘OUTPUT’ was not declared in this scope
Blink:15: error: ‘pinMode’ was not declared in this scope
Blink.ino: In function ‘void loop()’:
Blink:20: error: ‘HIGH’ was not declared in this scope
Blink:20: error: ‘digitalWrite’ was not declared in this scope
Blink:21: error: ‘delay’ was not declared in this scope
Blink:22: error: ‘LOW’ was not declared in this scope
This report would have more information with
“Show verbose output during compilation”
enabled in File > Preferences.
Doesn’t Work on IDE 1.0.5:
In file included from C:\Program Files\Arduino\hardware\arduino\cores\arduino/Arduino.h:213,
from Blink.ino:10:
C:\Program Files\Arduino\hardware\arduino\cores\arduino/pins_arduino.h:64:1: warning: “portOutputRegister” redefined
In file included from Blink.ino:10:
C:\Program Files\Arduino\hardware\arduino\cores\arduino/Arduino.h:145:1: warning: this is the location of the previous definition
In file included from C:\Program Files\Arduino\hardware\arduino\cores\arduino/Arduino.h:213,
from Blink.ino:10:
C:\Program Files\Arduino\hardware\arduino\cores\arduino/pins_arduino.h:65:1: warning: “portInputRegister” redefined
In file included from Blink.ino:10:
C:\Program Files\Arduino\hardware\arduino\cores\arduino/Arduino.h:146:1: warning: this is the location of the previous definition
In file included from C:\Program Files\Arduino\hardware\arduino\cores\arduino/Arduino.h:213,
from Blink.ino:10:
C:\Program Files\Arduino\hardware\arduino\cores\arduino/pins_arduino.h:66:1: warning: “portModeRegister” redefined
In file included from Blink.ino:10:
C:\Program Files\Arduino\hardware\arduino\cores\arduino/Arduino.h:147:1: warning: this is the location of the previous definition
In file included from C:\Program Files\Arduino\hardware\arduino\cores\arduino/Arduino.h:213,
from Blink.ino:10:
C:\Program Files\Arduino\hardware\arduino\cores\arduino/pins_arduino.h:45: error: conflicting declaration ‘const uint8_t port_to_mode_PGM []’
C:\Program Files\Arduino\hardware\arduino\cores\arduino/Arduino.h:127: error: ‘port_to_mode_PGM’ has a previous declaration as ‘const uint16_t port_to_mode_PGM []’
C:\Program Files\Arduino\hardware\arduino\cores\arduino/pins_arduino.h:46: error: conflicting declaration ‘const uint8_t port_to_input_PGM []’
C:\Program Files\Arduino\hardware\arduino\cores\arduino/Arduino.h:128: error: ‘port_to_input_PGM’ has a previous declaration as ‘const uint16_t port_to_input_PGM []’
C:\Program Files\Arduino\hardware\arduino\cores\arduino/pins_arduino.h:47: error: conflicting declaration ‘const uint8_t port_to_output_PGM []’
C:\Program Files\Arduino\hardware\arduino\cores\arduino/Arduino.h:129: error: ‘port_to_output_PGM’ has a previous declaration as ‘const uint16_t port_to_output_PGM []’
download this modified arduino it has already built in atmega32 support.
https://www.dropbox.com/s/1hk1dplaptzcuv9/arduino-%23%24.1.zip.
There is no installation file in the folder.It just stops working whenever I click tools in the Arduino IDE.Please give the installation file.
arduino is not stopping actually it takes a lot of time to load tool option as there are a lot of com ports available to scan. just try the same thing with ur bluetooth switched off.
can you please upload the file again?
Hello Achu,
I was searching for Atmega 32 support in Arduino. It is very good and steps (procedure) mentioned for modification are very much clear. I appreciate your work and thaks for posting.
It doesn’t work with Arduino 1.0.2:
Blink.ino:9:21: error: Arduino.h: No such file or directory
Blink.ino: In function ‘void setup()’:
Blink:14: error: ‘OUTPUT’ was not declared in this scope
Blink:14: error: ‘pinMode’ was not declared in this scope
Blink.ino: In function ‘void loop()’:
Blink:19: error: ‘HIGH’ was not declared in this scope
Blink:19: error: ‘digitalWrite’ was not declared in this scope
Blink:20: error: ‘delay’ was not declared in this scope
Blink:21: error: ‘LOW’ was not declared in this scope
Hello sir ,
What interface to use? FTDI?
I have an Arduino Duemilanove. I love your idea, I made all the changes indicated. I do not understand the scheme to use. I am only 12 years, I am student.
I absolutely love your blog and find most of your post’s to be what precisely I’m looking for. can you offer guest writers to write content for yourself? I wouldn’t mind publishing a post or elaborating on a number of the subjects you write concerning here. Again, awesome website!
Using this method is it possible to get the full functionality of ATMega32 ? I mean to say do you get 32 GPIO.
No, I think full functionality of 32 GPIO pins of ATMega32 are not available. We have to sacrifice some pins for the ease of programming in arduino environment
If i use a sanguino which uses ATMega 644 mcu (40 pin), then applying your scheme will it be possible to get the full functionality of ATMega 32 in arduino environment. If possible then kindly provide the pin mapping and changes in the board.txt and other changes for fuse setting and others. Thanks in advance
Beautiful clone. But ATMega 32 can be programmed using Arduino ATMega2560? Pin layouts will be different? For your clones why didn’t you use ATMEga328? Are they costly or not available easily. Also what make and from where have you purchased your USBASP also kindly mention protocol and version for the USBASP
i did as u said and uploaded the led blink example on pin 13 and instead of blinking every one second it blinks every 16 seconds im confused .
I feel that you haven’t set up your fuse bits to use the external crystal. The Arduino library assumes that your hardware is running at 16 MHz for Atmega32. While the AVR Microcontrollers are shipped with the default fuse setting of internal oscillator to run at 1 MHz. This explains why your code is running 16 times slower. Update your lfuse settings o use external crystal and everything will be fine
Hello Achu,
First of all wish to convey my sincere thanks and hats off to your noble intention of having shared this vital knowledge with everyone. Hats off to you and thanks.
BTW I also faced the same problem of my LED blinking slower than 1s but the arduino program works fine. Can you tell how to go about connecting a 20 mhz crystal, the capacitors needed? Also please let me know if changing the fuse bits and the clock speed in the boards.txt will suffice or where should that be changed if it is not boards.txt but elsewhere.
Thanks in advance.
Regards,
Ashok Srinivasan.
I need a clarification Achu.
What are the capacitors needed to be connected if i plan to use 20 MHZ crystal with my atmega32? and what will be the values of the high and low fuse bits? Is there a way to calculate these things ? is there anything else that also needs to be considered.
Regards,
Ashok Srinivasan.
the above procedure is not working. m still getting error of previous deceleration in header file in core directory in compiling code.
Ashi
Hey tried the steps as mentioned , but when I am compiling the code I am getting a “out of scope ” error for all of the regular functions in Arduino IDE
Hello guys,
this link http://ww.thiems.eu/prangelsatz is a project at our university in Germany, Bocholt.
The content is about the Prangelsatz. This is not a real word, so google doesn’t know anything about this, if the project has been started.
After we and our class member implement pages about the Prangelsatz, google recognize this word.
So if you want do some good things, click on the link above and comment what is good or bad on our page.
Greats,
Sebastian